A loft conversion is one of the most versatile spaces for a home cinema — and one of the most technically demanding to install correctly. This is the story of how Zebra Home Cinema transformed a loft into a complete family entertainment space, documented from the first cable run through to the finished result.
Why a Loft Conversion Can Be Better Than a Basement Cinema
Most people assume a dedicated basement makes the best home cinema. Lofts are often overlooked — but they offer a serious advantage: natural void space. As lead installer Kane explains:
"Wiring it is a lot nicer because we get loads of voids and cavities to do it. So it's quite quick to wire."
That said, lofts introduce unique acoustic and structural challenges that basements don't. The pitch of the roof in particular requires careful planning — it affects both speaker placement and acoustic treatment options in ways that flat-ceiling rooms simply don't.
The System Specification
The client wanted a space that could serve the whole family — serious cinema performance when needed, but comfortable for daytime TV, music, and gaming. That brief led to a 7.2.2 Dolby Atmos configuration rather than a more extreme dedicated cinema layout.
| Component | Specification | Notes |
|---|---|---|
| Surround system | 7.2.2 Dolby Atmos | M&K Sound speakers throughout |
| Surround speakers | M&K Sound SCP series | Ceiling-mounted rears due to corridor constraint |
| Atmos speakers | M&K Sound in-ceiling | Centred in room, in-line alignment |
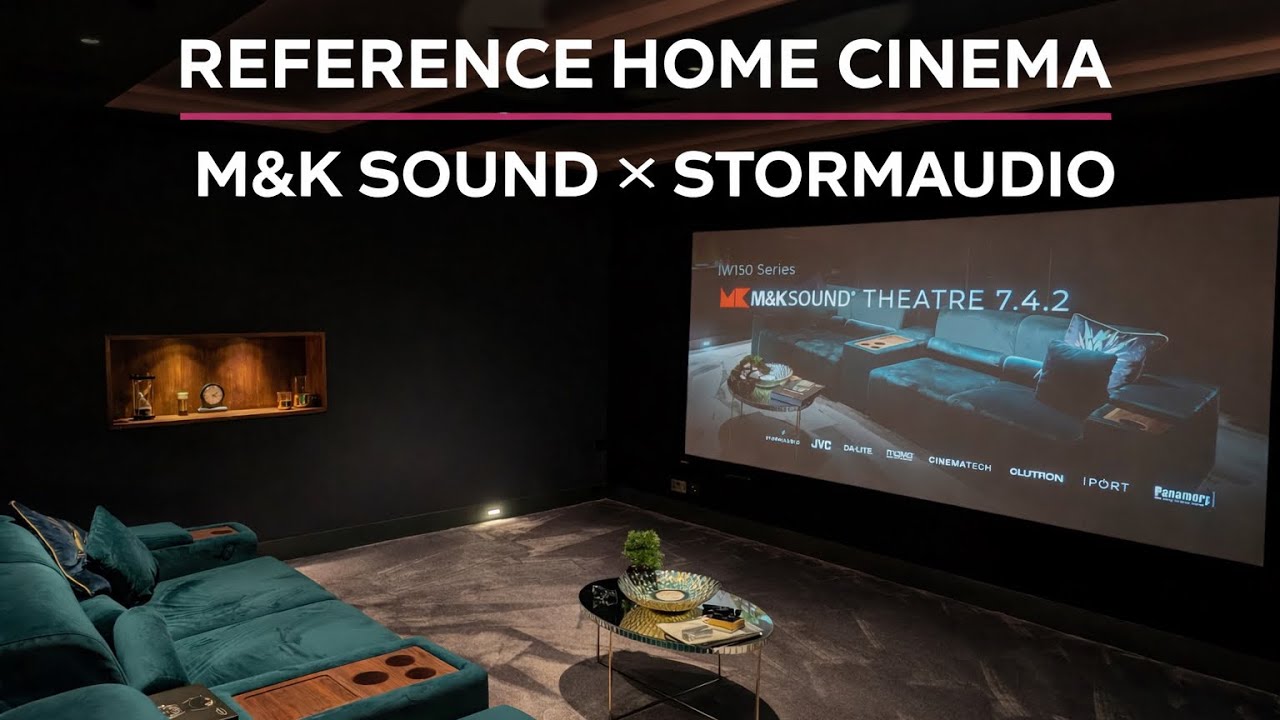
| Screen | Screen Research 128" × 235 | 2.35:1 aspect ratio, acoustically transparent |
| Screen gain | 1.1 gain | Optimised for throw distance |
| Projector | [Installed in follow-up video] | Quiet operation specifically noted by client |
| Cabling | SCP 16-gauge speaker cable | Run before plasterboarding |
The screen choice is worth noting: Screen Research's acoustically transparent material allows the front LCR speakers to sit directly behind the screen, giving genuine cinema-style audio without visible speaker grilles breaking the visual field.
The Structural Challenges
Loft conversions force compromises that garages and basements don't. The two main challenges on this project:
1. The pitched roof limits speaker positions
A flat ceiling gives freedom to place Atmos and ceiling speakers wherever the geometry demands. A pitched roof means every speaker position must account for the angle — both for mounting and for the acoustic dispersion pattern. Off-axis Atmos speakers lose much of their effectiveness.
2. A corridor blocked the ideal rear speaker wall
"This particular install is a challenge because we can't put the rears on the rear wall because there's a corridor down the one side. So we're having to put the rears in the ceiling."
The solution — ceiling-mounted rear surrounds — required precise positioning to maintain the envelopment a 7.2.2 system is designed to deliver. The MK speakers were encased in ply mounting blocks fitted before plasterboarding, ensuring a clean finish with no visible fixings.
Re-thinking the Room Brief
The client's original vision was a dedicated purist cinema room — dark, CinemaScope ratio, hardcore. But after consulting with their family, they pivoted to something more practical.
"Taking more into account what the family wanted as well, the kids and her niece as well. I think we realised that a media room would be more appropriate."
This is one of the most common design decisions Zebra encounters. A dedicated cinema room delivers a more intense experience at maximum performance — but a media room that the whole family uses daily delivers more real-world value. The loft's integration with a library space sealed the decision.
The result: a room that functions as a proper cinema when required, but works equally well for music listening, gaming, and casual viewing. The client describes it as having "more purpose."
The Installation Process — What the Client Noticed
The phased installation across a live construction project is one of the harder coordination challenges in home cinema. Pre-wiring during the build is critical — cable routes that take 20 minutes during construction take hours to retrofit after plastering.
The client observed the installation closely and commented on three things:
- ▪Efficiency — "I was quite surprised at the amount of work and how efficiently they got it done."
- ▪Cleanliness — "Very clean, very very high quality installers."
- ▪Communication — "Good communication about when the installations will be done, how long they would take... that takes the stress out of it."
Zebra handled direct liaison with the builder — coordinating cable routes and speaker positions around the build programme so the client had a single point of contact rather than managing two trades simultaneously.
Screen Installation — The Screen Research System
Screen Research screens use a tensioning system designed to eliminate wrinkles and maintain optical flatness over the long term. The installation involves:
- 1.Metal rods inserted into the screen frame
- 2.Screen material tensioned to precise specification
- 3.Elasticated bungee cords on upper and lower panels to maintain tension at both edges
- 4.Two rollers installed and powered up for auto-masking calibration
The auto-masking feature allows the screen to adapt its black border to different aspect ratios automatically — switching between 16:9 for TV and 2.35:1 for film without manual adjustment.
The Client's Verdict
The finished room delivered beyond expectations on two fronts the client didn't anticipate:
"I think what's really even surprised me was the real clarity of the speech on the film, but also obviously then you get the dramatic effects as well. I think it's hard to describe but it really puts you into that movie atmosphere."
On projector noise — a common concern people don't think to ask about until it's too late:
"The one we had previously, you will hear something going on in the background. But here it's above our head, we don't really hear anything."
Projector noise isolation in a dedicated projection void is a small detail that separates a professional installation from a DIY setup. When you're watching a quiet scene, a noisy projector fan destroys immersion.
Key Takeaways for Your Own Loft Cinema Project
- ▪Cable before plaster — the single most important step. Don't start a loft cinema project after the builder has plastered.
- ▪Pitched roofs require a speaker plan — don't assume standard positions will work; model the geometry first.
- ▪Media room vs. cinema room — decide early, involve the whole family. The answer changes the brief significantly.
- ▪Acoustically transparent screens — they cost more but give genuinely better audio placement for serious cinema rooms.
- ▪Projector placement matters — a dedicated projection box above the seating removes fan noise from the listening environment completely.
Frequently Asked Questions
How much does a loft home cinema conversion typically cost?
Costs vary significantly based on system specification and room size. A well-specified loft media room with Dolby Atmos, a quality projector, and a 100–128" acoustically transparent screen starts from around £30,000–£50,000 for the AV installation (excluding any structural loft conversion work). Reference-level builds go considerably higher.
Can you install a home cinema in a pitched-roof loft?
Yes — but it requires more planning than a flat-ceiling room. Speaker positions need to account for the roof angle, and ceiling Atmos speakers may need to be angled or repositioned to maintain correct geometry. An experienced installer will design around the constraints rather than ignore them.
Should I choose a dedicated cinema room or a media room for my loft?
If the room will be used daily by the family, a media room layout (comfortable seating, ambient lighting, daytime usability) is usually the better choice. A dedicated cinema room delivers a more intense performance but is less versatile. The answer comes down to how the room will actually be used most often.
What is an acoustically transparent screen and do I need one?
An acoustically transparent screen allows your front left, centre, and right speakers to sit directly behind the screen — just like a commercial cinema. The audio appears to come from the correct position on screen rather than from speakers positioned to the sides. For serious cinema rooms with a 5.1+ system, it makes a noticeable difference to the experience.
How long does a loft home cinema installation take?
The AV installation itself is typically 2–4 days for a system of this complexity. However, the pre-wiring phase during the build adds time across the overall construction programme. Coordinating with your builder to run cables at the right stage is critical — and ideally, your AV installer should be involved from the loft conversion design stage.